Tuesday, October 30, 2012

OOTD:: Business Casual

Two weeks ago I road tripped up to my dad's show market for furniture and rugs up in Highpoint, North Carolina.  My dad owns his own rug business called Chandra Rugs. The rugs are beautiful, handmade rugs with amazing textures and looks imported from India.  Seasonally, show markets are held to display wholesalers products and I love to help him out and check out other businesses!  People dress anywhere from super casual to business formal.   Usually, I like to wear business with a hint of casual since there is a lot of standing and walking done.  Here's some pictures of my weekend at Chandra's amazing, newly designed and newly branded showroom!
Here's how it looked when customers first entered! Welcome! :)

The first set up as you walk in displaying how a Chandra Rug could be set up and displayed.


Our Thomas Paul Collection.  Love his designs and colors!


The bar/coffee area to entertain our guests/buyers!

Have you tried a Chandra coffee? :)

This was my favorite room!  On the chalkboard wall was the question, "What is Modern?"  Here, guests could write what they thought were modern.

Love the mirrors!

Chandra pins :)

 The owner of Chandra Rugs and my dad! :) :)


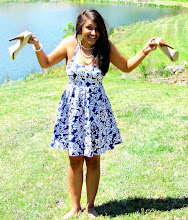
And now onto the outfit of the day:: 

Lace and prints!

I loved this look because it was fitting to my age compared to all the older businesswomen but yet classy and business enough for the occasion.  It was pretty chilly so I added a simple touch of tights underneath and covered up with this cute black fitted blazer.

I love everything lace and paired it together with this eautral printed top!  Kept it to black and white colors.  Always a perfect go to!

ps, don't forget to smile =)

Friday, October 26, 2012

Friday Favorites


Here's some funny jokes to start your weekend off!
--What did one casket say to the other casket?
Is that you coffin?
--What do you call a witch at the beach?
A sand-witch
--What do you call a dead person in the closet?
--1966 hide and go seek champion 
HaHaa! I'm all about corny jokes and spirit! And this Friday Favorites will be in honor of ol' spooky
 Halloween!!!
Favorite Costumes::
Nomnomnom DIY cookie monster

Kids make just about anything look presh!

Feeling sweet?


Favorite Spooky Decor Ideas::
Cheap and easy! Add white sheets on top of your furniture for a quick spooky makeover!

Put a water balloon with a glow stick on the inside of a stocking and hang from the trees or ceiling
                  

 Tack on some bat sheets on the wall for a creative and cheap look!
Tutorial found here:: http://www.danamadeit.com/2010/10/bats.html
Favorite Spooky Party Favors::
Freeze water in a rubber glove for a scary ice cube!

Create your own labels to put on your drinks!

Favorite most creative costume::

Have a safe and spooky weekend!
ps, don't forget to =)


Monday, October 22, 2012

Mani Mondays:: Neutral Ombre

Neutral Ombre

Good Morning y'all!  I just first want to say thanks for checking the page daily and sending messages, it does mean alot! I'm truly sorry about slacking on OOTD and food entries and whatnot, but I am back and not as busy now.  
Hope your weekend was as fun as mine! I'll post an entry later this week about what mine was filled with :) exciting things!  Onto Monday Mani! This week I just wanted something solid yet cute, and with my love of ombre, I figured why not do a neutral ombre?

Here are some of my favorite ombres::

who doesn't like a little sparkle? 

another form of the neutral ombres::

lately i've been loving the olive greens...

get romantic with this pink to red ombre ;) <3

reminds me of a beautiful sunset, ahhh...

Have a great week! Keep your head up and helping!
ps, don't forget to =)

Monday, October 15, 2012

Mani Monday:: Caviar Nails

Side Order of Caviar Please

Who needs the real expensive dish when it looks better on your nails? No, no, I'm not talking about caviar as something you eat, I'm talking about this season's latest style, micro beads on your nails!  When I saw this at Sephora, I just had to get them and try it out for myself.  I love playing with the texture of it and I absolutely love how its a different look that not everyone has.

First and foremost, wipe any polish off your nails, cut, shape, and whatever you need to do to them and then wash your hands.  Now apply one coat of whatever color you want.  I trial and tested and found that using white under the white caviar beads worked out he best since they were the same color and it help make it stand out more.  I then proceeded to paint all my other nails black.

Now you can start your coat and caviar process.  Start off by applying a second coat of color over the nails you want caviar-d, and let the polish get sticky for 10 seconds.  Then, over a sheet of paper, cup, or tray, pour the microbeads over the entire nail making sure to get all your whole nail covered. 

Now you can "Im-Press".  In this step, you want to gently press down on the caviar beads to secure the beads even more.  Then apply a thin layer of lop coat over the beads to ensure a longer life.  

A small funnel comes with the nailpolish set, so carefully use that to pour the excess beads back into the bottle for a future use!  Voila! You now have a classy, different look right on your nails!


 Happy Monday!
ps, don't forget to =)


Monday, October 8, 2012

Mani Mondays:: School and Sorority Pride

School Spirit, rah, rah, rah!


So this week is my school's homecoming week.  And as y'all know by know, any reason for me to do my nails, I will! What better way to show school pride then to show some pride on your nails??  My school's mascot is the owl so I attempted my version of an owl with our school colors, black and yellow.  This week also has a competition between the different fraternities and sororities and so of course I had to show some Kappa Delta pride.  Check it out!

(excuse the sloppy work on my fingers and the avalanche of nail polishes behind)
First, I started off by painting all my nails black.  Next, I took my index finger and painting a thick white line across half of my nail. Then I proceeded to draw almost a triangle shape from the end of the white to the end of my nail like shown below.  This will be the owls ears.


Go ahead and dab another triangular shape on the other side of the nail like shown below. Can you start seeing the owl?? I promise it looks harder then it seems but you can do it!


Owls are known for their big eyes.  Since my school colors are black and yellow, I chose those colors when creating my owl.  I chose the darkest color, black for his eyes and yellow for his eyeballs.  Remember to just dot on these eyes.  I then made an upside down u-shape and filed it in to the edge of my nails, like shown below.


Now dab on a small upside down triangle and voila! You now have one school spirited set of nails!


On my right hand I decided to paint all my nails black to be in uniform with the other hand and still school spirited. But instead of drawing an owl, which would be 10x harder since I'm right handed, I chose to go for something easier and just show spirit in show of the games and my love for Kappa Delta!  I painted my index finger a light green like so.


This set of nails is definitely an easier one. All you do next is draw on "KD" with their other color white and voila! You're done.


Finish off your nails with a top coat and you're done! Cute and school, and greek spirited!


Happy Monday!
don't forget to =)

Monday, September 24, 2012

Mani Mondays:: Burberry Inspired


Burberry Inspired 

So I must say I do love this style! I feel that it is classy and a great transition into fall with the red, beige, and black tones.  I've worn it only for a day and have gotten so many compliments!  Not going to lie, this one does take a little more time than usual and more concentration, but I am sure y'all can do it!


Start off by cleaning, cutting, filing, and washing your hands as usual.  You always want clean, polished hands when painting.  I used a champagne/beige color as my base that resembled Burberry's.


Now here is where it gets tricky.  Look at my middle finger with only the white lines drawn on it.  Thats where you will start.  Paint on with a thinner tip two lines horizontally and two lines vertically as shown above.  Leave enough space between so the black line could be drawn  right in.  
Next, fill in the lines with the black polish.  I painted on the vertical lines, to the right of the whites, two more black lines.  Then one black line horizontally in between the other two, as shown on the picture on the right. Remember, slow and steady wins the race!


Then you can paint your red lines.  You just want two lines, crossing each other, as shown on my index finger.  These two lines will be on the other side, so on the left, of the nail.  Now finish up your other nails! 

              
And that is it! Finish it off with a top coat and you're done! You now have your timelessly created nails! Good luck!
Have a great start of the week!
ps, don't forget to =)

Saturday, September 22, 2012

What's to Eat??? Black Bean Burgers

Fresh Black Bean Burger

Since I am a vegetarian, burgers used to never even be on my list of food that I would eat.  Usually I'm not a huge fan of fast food veggie patties or restaurants'.  This past summer I spent my time at my sister's up north.  She is a huge foodie and cooks the best food  (besides my mom ofcourse)and she tries to make everything healthy too! 
So her and her husband introduced me to black bean  burgers.  Sounds normal right? Yes, I've had them before but they usually for some reason aren't THAT great.  But she made hers from scratch and wowzers! I fell in love!  Check this out and try it for yourself!


You will need::
1 can of black beans (will give 8 patties) ***UPDATE*** (look below for an update of the black beans!!)
-You will want to mash up and beat the black beans up until it is nice and mushy.


Then whip out the food processor.  You will now need::
-half of an onion
-4 cloves of garlic
-1/2 of a bell pepper
-Put all these ingredients in the processor and start it up till it's mixed well.
-Then using your hands or a cheese cloth,  squeeze all the water you can out.  Doing this helps with the texture and tastes better too.


Now mix the processed, watered-out mix with the mashed black beans. Mix this mix really well.


Seasonings::
- 1 tomato can paste(a substitute for 1 egg)
1-2 teaspoons of garlic powder (add more depending on how much you like garlic)
2 teaspoons of oregano
1-2 teaspoons of chili flakes (again, add more depending on your tastebuds)
 1/2 taco seasoning mix packet
Mix all of these ingredients well.

Now mix the seasonings with the black beans mashhup.
This mix is going to be wet so add about 1/2cup to 1 cup of breadcrumbs until the mix doesn't stick to your hands anymore.  You can now form your patties and put onto a Pam-ed cookie sheet.


If you want to bake::
Bake  your patties @ 375 degrees for 30 mins.  
15 mins in, turn over the patties to the other side.  
If you want a little crispy, after 10/15 minutes into the baking,  turn it up to 400 degrees.

If you want to grill::
You have to freeze the black bean burgers for at least 30 minutes so it's solid enough.
Place the burgers on an aluminum sheet and then onto the grill for 10-12 minutes on each side at about 400 degrees.


Get whatever you want to put in your burger, some tots, fries, corn, salad  and eat away now! :)
The best thing about this is that it is fresh and you can also put them in the freezer and whenever you want to eat it, you can just pop it in the oven!  You can also grill these.
Enjoy eating fresh black bean burgers!!
ps, don't forget to =)

**UPDATE!!** Click on the link below for an awesome Black Bean recipe instead of using a can! Fresher and healthier and even tastier!
Fail Proof Black Beans