Showing posts with label DIY. Show all posts

Wednesday, February 12, 2014

DIY Love-dovey Cheesy Pillowcase


Happy HUMP DAY!!! I still can't seem to get over that Geico commercial; I still seem to giggle thinking of that camel, haha. But anyways, with Valentines in TWO DAYS, some of you probably have't even thought of a gift.  Yeah, you can go for the usual flowers, chocolate, and giant teddybear, but why not think of something more unique and creative? 
My brother and his girlfriend live fairly far away and so this past Christmas, I decided to recreate this pillow case I saw over at Bold Loft.  I feel like making something yourself, as unperfect as it can get, still means a lot more than just buying something.  This pillowcase is perfect for your loved ones or just as a birthday gift or friendly gift to give! ?it is sweet and you know they will always think of you when they're off all snuggled up and sleeping away. I gave the guy pillow to my brother and the girl pillow to his girlfriend and they tell me all the time how they just love it and people are always commenting on it!

What you will need::

  • 2 basic pillowcases (I brought two white jersey type pillowcases from Target)
  • A black and red fabric permanent marker
  • A Design you think is everything cheesy! (Bold Loft has great ones!)
Instructions::
  1. Take one pillow case and put a layer of cardboard or something in between the sheet so you can draw on one side without it leaking onto the next.   
  2. You can start with a pencil to outline what you would want to draw, or you can be ballsy like me and free hand it.
  3. Lay your sheet out straight across a table and start drawing. Once finished, take the 2nd pillow case and make sure you line it up with the 1st one so it flows together nicely. 
  4. Draw your design for the second pillow case.
  5. Voila! Giftwrap them together or separately! 
You now have the cutest and cheesiest His and Hers pillow case! Enjoy!

Check back tomorrow for Part 2 of the Vegas weekend getaway!
ps, don't forget to =)


This entry was posted in

Wednesday, August 14, 2013

DIY:: Old table turned into Vanity Table

Cheap table turned into Vanity Table

I am so excited about today's post because it is SO simple to makeover and very cheap! #brokecollegekidproblems haha I found this simple table on craigslist for about $10 and just thought it was boring and hated the green for my room.  So I went over to Hobby Lobby and bought a few things like spray paint, paint, and found a few miscellaneous things on clearance to spruce up my table, and then I was ready to start!

It all started with this plain table with the green top...

I used a matte white spray paint and sprayed evenly all over.  You usually have to wait a few hours to let it dry before you can do a second coat. I waited until the next day.

I strongly suggest a second coat, unless you like the look of how the first coat came out.  In my case, I was trying to get rid of the green so I had to coat it again. Then let it dry for a few hours.

Anyone that knows me knows that I just I just love monograms.  I think adding a little personality to your table makes it that much better.  I added a cute border around the sides and then used a cursive monogram font for the initials in the middle.

I also wanted to go with the theme colors in my room-pink, grey, white-the soft colors and loved dipped items so I decided to do a DIY dip to my table by painting 3/4 of the legs grey.

Dont forget to paint over the edges!

And voila! Added some desk goodies and a mirror and I now have a chic table for less!

As Albert Einstein once stated, "Creativity is intelligence having fun," use your mind and don't be afraid to mix styles, try something different, "take the road less traveled."
Making over furniture is always such a cheap and fun use of your time! It can get tedious but will be so much worth it at the end because it is a statement that YOU created and you ACCOMPLISHED. 
Check back tomorrow for a thoughtful Thursday post and later this week for an ootd! :)
ps, don't forget to =)

This entry was posted in

Thursday, April 18, 2013

DIY:: Chevron Bulletin Board

It is very hard to find cute, big bulletin boards that are inexpensive as well.  I am a hands-on learner and even though Pinterest and my phone calendar is a good way to write and keep things, sometimes it is just easier having it on a board that you can put things up on, the traditional way.  I made this chevron bulletin board in under $$10!!!  Guys, you can do this too with your own fabric choice!
First start by buying a board, pushpins, and fabric of your choice.  I found this huge board at JoAnns for $3 and sized the fabric to fit the board with an inch extra all around.  

Now place your fabric all over and flip it over, like shown below.  Here, all you do now is just use the pushpins and pin down the fabric to the board. That simple! 

Now put it up in your room and start putting up whatever you would like!
It just took less than $10 with only 5 minutes to make.  You can use whatever fabric you would like and get as big of a board as you want!  Have fun!  Check back tomorrow for some Friday Favorites.
ps, don't forget to =)
This entry was posted in

Thursday, January 3, 2013

DIY:: Melted Crayon Art

This was one of my favorite DIY projects!  I've been wanting to do this for a while now but just haven't had the time.  It is super easy and just so awesome to watch melt! 
What you will need::
  • Crayons
  • Glue Gun along with glue sticks
  • Marker if you wanted to draw
  • Any size canvas you want
  • black paint
  • hair dryer
  • tape
  • and something to keep your work from getting too messy; I used newspaper


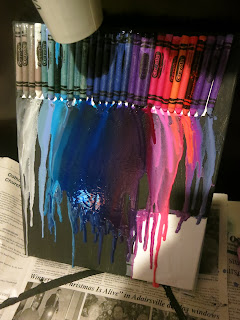
Start off painting your canvas black.  Once dry, hot glue your arrangement of crayons.  Just hot glue the end of the crayon so it stays in place.  Make sure to leave a white space for the drawing!

Don't forget to tape your white space so it doesn't get too messy.  You want to prop the canvas up against a surface, a bit slanted.  That way it is easier for the crayons to melt down. Now take your hair dryer and start blowing away!

You can experiment here.  Blow to the right, blow to the left, blow straight down! Watch the colors blend and melt away!


How awesome does that look?!?

Now slowly take your tape off.

I decided to draw a couple underneath an umbrella.  Theres the pencil sketch.

And the finished product!  For those of you who watch How I Met Your Mother, the yellow umbrella is indeed symbolic ;)

I loved it so much I decided to do another one!  I started out by laying out my colors.

Then arranged them into a heart-shaped design and starting hot glueing it to stay in its place.

This one was different than the other because I literally had to keep turning the canvas and tilt it down for it to splatter since the design was a circle type.

Finished product!!  Look at all this mess!  I wasn't kidding by saying it leaves a huge mess!

Still looks soo amazing!

What design are you going to try?
Happy crafting!
ps, don't forget to =)

Sunday, November 18, 2012

Crafting:: Nameboard

I found this idea of Pinterest and decided to do one of my own!  It was easy, cheap and so cute!

What you will need::
cork board (to the size you want it to be)
assorted colors of embroidery floss (i used ROY G BIV)
nails or push pins (i used around 200)


You can use a template from online and print it out and trace it as a reference, but I am pretty good with letters so I just free-handed it.  I found if you are doing a word instead of one letter, then a cursive font works alot better and smoothly.  I decided to use my last name Tiwari.

After you traced an outline of the font you want, place nails/pushpins outlining the letters.
I thought this part looked cool itself!


Now the fun part---STRINGING!  I did the rainbow effect but you could do an ombre, one color, your favorite team's color, or whatever as well.

Here is the key:: you want to tie a small knot to the pushpin/nail each time you use a new string or end it.  It doesn't matter where you start or end.  Now you can begin!   Just basically start weaving back and forth, up and down, whichever way you want!  The best part is that you CAN'T go wrong!  Just let it flow, don't think too much about it.  I actually found that overlapping alot looked better.

I kept moving through the color spectrum as i worked into the word.  Overlap here to blend the colors!


And voila! simple as that! I decided to color in some in black to help show the letters more easily and created a boarder.

  You know have a new wall decor that was made by you, simple, and cheap!  Try out other colors and fonts and see which way you like it better!
ps, don't forget to =)

Saturday, November 3, 2012

DIY Crafting:: Lilly Frames

Who does't like Lilly Pulitzer and who doesn't like spending less??  Combine those two and we have a winner!  During this event called "Twin Week," we were to craft or buy different items for our twin.  I decided to craft since I think it is so much more meaningful and fun!  The first day was a picture frame and I wanted my frame to stand out then some ribbon or letters, so I decided to replicate the Lilly Pulitzer print! It was SO EASY and yall can do this at home!
What you will need::
You can always choose different colors but I wanted to recreate this print::

Paintbrush ( I used to, a thinner one and a regular sized one)
Light Pink paint
Dark Pink paint
Navy Blue paint
White Paint
Green Paint
and a cloth or something to work on


First, go ahead and paint your whole frame with a blue base and let dry.


 Now add some random pink flowers that sorta look like the print.  I added the word twin to make it more suiting for the event!


You can now add some greenery and light pink  flowery shapes.


Use white paint and a small paint brush to start roughly outlining the shapes.


And Voila!! Add a picture and you are now ready to gift this cute frame or keep it for yourself!  You can know even boldly try out some other prints! Good Luck and have fun this weekend!
ps, don't forget to =)