Thursday, January 3, 2013

DIY:: Melted Crayon Art

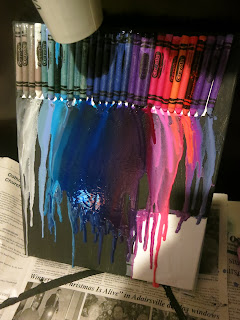
This was one of my favorite DIY projects!  I've been wanting to do this for a while now but just haven't had the time.  It is super easy and just so awesome to watch melt! 
What you will need::
  • Crayons
  • Glue Gun along with glue sticks
  • Marker if you wanted to draw
  • Any size canvas you want
  • black paint
  • hair dryer
  • tape
  • and something to keep your work from getting too messy; I used newspaper


Start off painting your canvas black.  Once dry, hot glue your arrangement of crayons.  Just hot glue the end of the crayon so it stays in place.  Make sure to leave a white space for the drawing!

Don't forget to tape your white space so it doesn't get too messy.  You want to prop the canvas up against a surface, a bit slanted.  That way it is easier for the crayons to melt down. Now take your hair dryer and start blowing away!

You can experiment here.  Blow to the right, blow to the left, blow straight down! Watch the colors blend and melt away!


How awesome does that look?!?

Now slowly take your tape off.

I decided to draw a couple underneath an umbrella.  Theres the pencil sketch.

And the finished product!  For those of you who watch How I Met Your Mother, the yellow umbrella is indeed symbolic ;)

I loved it so much I decided to do another one!  I started out by laying out my colors.

Then arranged them into a heart-shaped design and starting hot glueing it to stay in its place.

This one was different than the other because I literally had to keep turning the canvas and tilt it down for it to splatter since the design was a circle type.

Finished product!!  Look at all this mess!  I wasn't kidding by saying it leaves a huge mess!

Still looks soo amazing!

What design are you going to try?
Happy crafting!
ps, don't forget to =)

Monday, December 31, 2012

Mani Monday!

HAPPY NEW YEARS EVE!!!!!!

 Remember to be safe and enjoy your last minutes of 2012 and welcome on 2013!!! Heres my Mani for the New Years, black to match my outfit, with of course glitter!!! Can do New Years right without lots of glitz!!
ps, don't forget to =) 

Monday, December 24, 2012

Mani Merry Monday!

Happy Holidays!!! You all know I love dressing up for any occasion and why not do it with our nails too?? Here's my Mani Monday Holiday Version:: candy canes, Santa, and some glitter for snow! 

Enjoy time with your loved ones this week! Remember, 'tis better to give than receive!!  
ps, don't forget to =)

Saturday, December 22, 2012

Last Minute Shopping??

Gifts to buy your loved ones last minute!!

I know we all have procrastinated at this before.  Or we just don't know what to get at all!  Heres a quick list of things that could help us last minute gifters!

Guys for me always have been so hard to shop for, but heres a few foolproof gift ideas that you could always end up buying!

  • Cologne?? After researching I found out that Lacoste's Essential, the classic Ralph Lauren for men, Obsession by Calvin Klein, Dolce & Babbana, and of course the classic Abercrombie are some top liked scents!
  • A Book series or DVD series of his favorite show(s)??  That way, when he watches them he'll surely think of you :)
  • Clothes or accessories are always nice.  Can't go wrong with a nice pair of boots, ties, or sweaters!
  • Tickets to his favorite concert or sports team always is a great idea!
  • And then theres always the old saying, "Making a gift is more sentimental then buying one".  So you can make a scrapbook of your times together or something off Pinterest!  It shows you really put thought and time into him!
Girls are really happy with almost anything!  Anything from clothes, to makeup, to nail polishes, to books always works!!

Don't stress to much about what you get as a present.  The saying, "It's the thought that counts" really is true!  
Happy Holidays!
ps, don't forget to =)

Friday, December 21, 2012

Friday Favorites

Happy Holidays and Surviving the Apocalypse!! :)

I'm glad everyone happened to have survived and made it to the amazing Friday!! Happy 12.21.12 too! :) Here's some of my holiday favorites and funny apocalypse memes!
Favorite Merry Creative Treat:: Fruit trees!

Favorite Merry Manis::


Favorite Merry DIY Tree:: Love how modernized this tree is!
Favorite Merry Craft:: I crafted this for my apartment made of popsicle sticks! Will be posted how to soon!

Favorite Apocalypse Memes:: haha


Favorite Merry Funny Video:: Hilarious!

Have a great weekend! Be blessed and happy!
ps, don't forget to =)

Monday, December 17, 2012

Mani Mondays!

Merrry Mani Monday! 

Bright Lights

Who doesn't like the holidays??  My favorite part is all the lights and red and greens!  So with that in mind, I decided to do a mani showing off the bright lights!

So as usual, make sure your nails are filed, cut, and polished clean!

Now go ahead and use a white type of polish for a base.  

Then this is where it gets a tad tricky!  I used a black piece of thread to shape as the "string holding the lights."
I did different variations as you can see for the strings.  
The step is to polish once with a top coat, then quickly lay down your string as desired, THEN quickly again go over with a top coat.  This helps ensure the thread will stay.  


Once it is dried, go ahead and dot on green and red lights! and Voila!!

You are now ready for the holiday weekend!
Have a great fun filled start of the holiday week!! 
Remember, it truly is better to give than receive!
ps, don't forget to =)

Monday, December 10, 2012

Mani Mondays!

Today's Monday Mani was inspired by Pinterest.  I just thought it was too fun and cute not to recreate! 

First go ahead and paint all your nails the solid colors you would want.  I went with a pale pink, brown, olive green, and a creme for the decorative nails.

Next, on the nails you want to use the print on, go ahead and put dots onto them.  I did it on my thumb and ring finger.  I also think putting all the other colors in make it look better. Also, I found that putting little slash marks instead of dots came out for a better overall look.


Here you would want to find a thin paintbrush or black nail polish to use for the lines.  The thinner the better.  Also, don't be discouraged if you don't get it at first!  Practice makes perfect!
But here you will want to do small outlines, not perfect though, but around your dots/slash marks like shown below.  

And ta-dah! You now have some really cute nails!

Happy mani and enjoy your week!
ps, don't forget to =)